Complete Beginners Guide to Online Mahjong

Table of Contents
(well, almost complete)
This is the absolute entry-level page for anyone interested in playing Japanese Mahjong online on Tenhou and other sites. If you've always wanted to learn how to play but never really got down to it for lack of a comprehensive and complete resource in English, well, it's in front of your eyes now.
As this is a beginners guide, I am excluding various uncommonly-used rules and exceptions, in favor of sweeping generalizations and simplicity. I'm not going to document every single corner of the rulebook. With that being said, after reading this you should be familiar with 99% 95% a goodish portion of the situations you will face, starting out.
This will be a constant work in progress, and we'll be refining various pages and concepts when we get additional insights or when feeling contributive.
Part 1 is a run-through of the rules you can't get away with not knowing. If you skip parts, you will be back. I guarantee it. There's also a Part 1.5 for people who may want to use tenhou.net, the most popular online mahjong client.
Part 2 is a veritable smorgasbord of light introductions on various concepts of the game. However if you have never ever played mahjong before I suggest reading Part 3 first.
Part 3 is a bunch of playthroughs that will demonstrate the more practical side of play.
Overview
Japanese mahjong is a game where players compete to form complete hands by drawing, discarding and making use of other players' discards. Each player starts with 25000 points, and the first player to complete a hand each round receives points based on the scoring value of his hand.
If you draw the tile that completes your hand yourself (tsumo!) all other players contribute to the payment. (Current dealer pays half of the total value, other players pay a quarter each)
If you deal a tile that completes another player's hand (ron!) you are responsible for the entire payment.
Winds
At the start of a match, one player is randomly chosen as East, the dealer. Subsequent players are South, West and North. After a hand ends, the dealership changes to the next player, unless the dealer wins, in which case he continues.
Every round has a round wind/prevailing wind, starting with East and going into South for the second round, etc, each comprising one complete 'cycle' of the dealership.
In general, online matches are either tonpuusen (東風戦) one round or tonnansen (東南戦 which we also call hanchan, 半莊) two rounds.
You can keep on being dealer if you continue to win hands, the round ends in a non-exhaustive draw, or you can show a tenpai (needing one last tile to win) hand in the case of an exhaustive draw, when there are no more tiles to be drawn.
The advantage of being dealer is that your winning hands score 50% more. However if someone gets a tsumo, you are responsible for 50% of the payment, while the other players pay 25% each.
Building a hand and calling tiles
Actual play is simple. You draw and discard a tile when it is your turn, keeping your hand at 13 tiles after discarding. You use the last tile off an opponent, or the tile you just drew to make a 14-tile winning hand.
The object of messing around with your hand is to create four separate melds (mentsu), groups of three tiles, along with one pair of identical tiles.
Groups can be Shuntsu/runs/sequence, three suited tiles in ascending order
![]()
![]()
![]()
![]()
![]()
![]() etc
etc
or Koutsu/sets/triplets, three of the same tile
![]()
![]()
![]()
A Kantsu is four of the same tile grouped together, counting as a meld. If all four are in your hand, you may declare a closed kan! by exposing all of them, and drawing a tile from the wall. If these are the only tiles exposed in your hand, it still counts as fully concealed. If you made a pon earlier and draw the fourth tile, you may add it to the pon and draw again. If you have three of a tile in your hand and the fourth is discarded, you may also kan! and draw a tile. All tiles drawn from a kan are from the dead wall. Making a kan also flips over an additional dora indicator, creating 4 more dora (more on this later).
![]()
![]()
![]()
![]()
A complete hand comprising the above four melds would thus look like this
![]()
![]()
![]()
![]()
![]()
![]()
![]()
![]()
![]()
![]()
![]()
![]()
![]()
![]()
![]()
with ![]()
![]() as the pair.
as the pair.
You don't have to rely on the luck of the draw to get all the tiles you need by yourself. When an opponent discards a tile while you are holding two of the same, you have the option to pon! by grabbing it, exposing your now-complete set and setting it aside, while discarding a tile.
Chi! to complete a shuntsu or run can only be called if the discarder is the player to your left, i.e. immediately before you.
And of course ron! to complete your entire hand can be called on any opponent's discard.
Ron takes priority over Pon/Kan which takes priority over Chi.
Yaku
Of course, if it were just grabbing tiles to form random patterns in your hand, the game wouldn't be so complex. Remember when I was talking about scores? Your winning hand's score is determined by yaku(役), certain patterns of tiles in your hand, or restrictions adhered to by the tiles inside your hand. Each yaku is worth a certain amount of han(飜) or score multipliers. A hand can have more than one yaku, and indeed this is the key to high-scoring hands.
A hand must have at least one yaku to win the round. Dora and red fives add bonus han but do not count as this yaku.
Being lazy I will rip a page from past articles and introduce you to the most common yaku you will find, which will make up 95 percent-ish of hands you will see playing online.
1. Yakuhai + anything
Yakuhai are pons of the round wind, your seat wind, and the colored honors chun, haku and hatsu. The rest of the hand can be any melds, open or closed.
![]()
![]()
![]() + anything (Either you are East seat, or the round is East, or both)
+ anything (Either you are East seat, or the round is East, or both)
2. Riichi
I could write pages on riichi alone, as it is one of the more interesting aspects of Japanese Mahjong. The conditions for riichi are:
- Have a fully concealed tenpai hand (must not have called any tiles, needing the last tile to win)
- Have at least 1000 points (for the deposit)
- It is not your last draw of the game
A riichi entails depositing a 1000-point 'riichi stick' on the table, and discarding a tile sideways. The next player to win a hand receives the 1000 points. Incidentally if someone wins off your riichi discard (the sideways tile) you get the 1000 points back.
After you declare riichi, you have no more control over your discards. You draw as normal, but if it is not your winning tile you must discard it, although you may make a closed kan if it doesn't change your wait.
So what do you get for basically locking up your hand, announcing to everyone you are in tenpai, and potentially losing 1000 additional points to another player?
- Riichi itself as a yaku is one han.
- Ippatsu is getting a ron or tsumo in the next four draws after your riichi. Any calling of tiles breaks this chance. It is worth one han.
- Uradora is revealing all tiles under the dora indicators, for new dora indicators that apply to a hand winning in riichi.
3. Inside and outside - tan yao / chanta
Tan yao is when your entire hand is made from the suited tiles 2-8. That means no 1s, no 9s, no honors. That's it.
![]()
![]()
![]()
![]()
![]()
![]()
![]()
![]()
![]()
![]()
![]()
![]()
![]()
![]()
Chanta is sort of the opposite, when all your melds, including the pair, contains at least one 1 or 9 or honor.
![]()
![]()
![]()
![]()
![]()
![]()
![]()
![]()
![]()
![]()
![]()
![]()
![]()
![]()
Never even try to make this hand. Ever.
4. Funny patterns - Sanshoku / Itsu
Sanshoku is when you have the same sequence through all three suits in your hand.
![]()
![]()
![]()
![]()
![]()
![]()
![]()
![]()
![]() etc
etc
Itsu is the entire 1-9 sequence from a single suit
![]()
![]()
![]()
![]()
![]()
![]()
![]()
![]()
![]()
Being 2 han each normally, they are worth 1 less han when open, but can be used open in a pinch to supply a yaku if you need a fast win condition.
In a similar vein iipeiko is the same sequence repeated in a closed hand
![]()
![]()
![]()
![]()
![]()
![]()
5. Single-suit hands
Hon itsu - single suit + Honors
![]()
![]()
![]()
![]()
![]()
![]()
![]()
![]()
![]()
![]()
![]()
![]()
![]()
![]()
Chin itsu - everything is in the one suit
![]()
![]()
![]()
![]()
![]()
![]()
![]()
![]()
![]()
![]()
![]()
![]()
![]()
![]()
6. Pairs and sets
Chitoitsu - 7 pairs
![]()
![]()
![]()
![]()
![]()
![]()
![]()
![]()
![]()
![]()
![]()
![]()
![]()
![]()
Toi-toi - all sets
![]()
![]()
![]()
![]()
![]()
![]()
![]()
![]()
![]()
![]()
![]()
![]()
![]()
![]()
7. Pinfu
Pinfu, like many of the above hands, is just a restriction placed on your hand :
All shuntsu/sequences (no sets), any 2 tiles except value honors (yakuhai - ![]() ,
, ![]() in east round, etc) as the pair, and you must have a two-sided wait while in tenpai. For example,
in east round, etc) as the pair, and you must have a two-sided wait while in tenpai. For example,
![]()
![]()
![]()
![]()
![]()
![]()
![]()
![]()
![]()
![]()
![]()
![]()
![]()
in tenpai, waiting for ![]()
![]() , and additionally
, and additionally ![]() is not a yakuhai - it is not the west round and you are not west.
is not a yakuhai - it is not the west round and you are not west.
Although it sounds more complicated than most, this is a very common yaku.
8. Menzen Tsumo
In a fully concealed hand, draw the winning tile yourself. If your fully concealed hand has no inherent yaku you will not be able to ron off another players discard, though drawing it yourself will enable a win, as it contributes to the menzen tsumo yaku.
Mini Exercise
Here are some completed hands. Can you identify all the yaku they comprise? Answers can be easily checked against the list above.
![]()
![]()
![]()
![]()
![]()
![]()
![]()
![]()
![]()
![]()
![]()
![]()
![]()
![]()
![]()
![]()
![]()
![]()
![]()
![]()
![]()
![]()
![]()
![]()
![]()
![]()
![]()
![]()
![]()
![]()
![]()
![]()
![]()
![]()
![]()
![]()
![]()
![]()
![]()
![]()
![]()
![]()
![]()
![]()
![]()
![]()
![]()
![]()
![]()
![]()
![]()
![]()
![]()
![]()
![]()
![]()
Dora
At the beginning of every hand, a tile in the dead wall is flipped over to be a dora indicator. The next tile in sequence after it is a dora tile. Each dora tile in your winning hand counts as one han, which may drastically increase the value of an ordinary-looking hand.
Red fives are an optional rule popular on tenhou, replacing one of each five with a special one marked red, which counts as a dora.
Although they give additional han, dora and red dora do not count as yaku for the purposes of the 1 yaku restriction to form a winning hand. A common beginner mistake is assuming dora tiles count for yaku.
If ![]() is the dora indicator flipped up,
is the dora indicator flipped up, ![]() is the dora.
is the dora.
![]() ->
->![]() If it's a suited 9, it "wraps around" to 1 of the same suit.
If it's a suited 9, it "wraps around" to 1 of the same suit.
![]() ->
->![]() ->
-> ![]() ->
-> ![]() ->
-> ![]()
![]() ->
->![]() ->
->![]() ->
->![]()
If a player won after riichi, additional dora indicators under the normal ones are revealed and the new dora are counted normally for scoring. A kan in the course of the game reveals one extra dora indicator, if you were to riichi with any player having made a kan, you would have two chances at getting uradora.
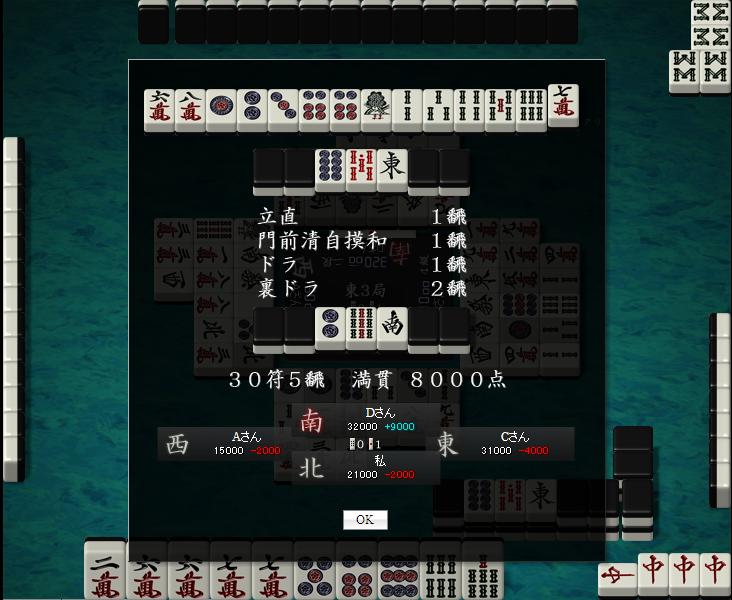 > With 2 kans being made, here the player winning by riichi has 1 normal dora (6s) and 2 uradora (3p, 1s).
For the full complement of yaku I would refer you to drob's excellent printable yaku chart. I do recommend you print it out and stare at it while playing, as going over possible combinations helps you remember them better.
Ending a match
A game ends when the last round finishes. On tenhou.net, if no players are above 30000 points after the last hand, play continues. If the dealer in the last hand wins the hand, play continues until he wins a hand to take first place, or the dealership passes.
Furiten
Furiten is a state where you cannot ron off other player's discards. Here is how you enter furiten:
- When you are in tenpai, but previously discarded one of your winning tiles. [Permanent, until you change your wait]
When you are in riichi and choose to pass and not ron on a winning tile [Permanent]
When you are in a non-riichi tenpai, and choose to pass on a winning tile. [Temporary, broken when you draw and discard a tile]
In the above context, a 'winning tile' is any tile that would have completed your hand, regardless of the yaku situation. For example: Your final wait is ![]()
![]() , waiting on
, waiting on ![]()
![]() , but actually only the
, but actually only the ![]() can win you the hand because your only potential yaku is tan yao (no terminals in your hand). If a player deals
can win you the hand because your only potential yaku is tan yao (no terminals in your hand). If a player deals ![]() and you do not ron, you cannot ron on any
and you do not ron, you cannot ron on any ![]() until you get to draw and discard again.
until you get to draw and discard again.
If you draw ![]() yourself and discard it, you are in permanent furiten and cannot ron on
yourself and discard it, you are in permanent furiten and cannot ron on ![]() until you change your wait, say, by drawing
until you change your wait, say, by drawing ![]()
![]() or
or ![]() .
.
Of course, if you are in furiten, drawing the tile yourself will still win you the hand.
Exhaustive draw
An exhaustive draw happens when no player has won a hand, and all the tiles except the dead wall have been drawn and discarded. After the last tile, players in tenpai show their hands. All players not in tenpai (no-ten) contribute equally to a penalty pot of 3000 points, shared among all players in tenpai. If two players are in tenpai and two are in no-ten, the no-ten penalty would be 1500 points, and each player in tenpai would receive 1500 points as well.
Scoring
Scoring hands in Japanese mahjong is a terrible, terrible business. As a beginner however, you can get by amazingly well by only remembering a few important bits. You will want this yaku chart to look up the value of various yaku. Most of the more common ones are around 1-2 han, and huge hands are primarily made through the stacking of various minor yaku. Here is a complete score chart made by CriX who incidentally was also the editing force behind most of the anonymously translated saki/mudazumo chapters that popped up before scan groups picked them up, a true bro you owe some fisting.
Here is an easy-to-remember table with the approximate values of hands you will usually get. This is meant more for an illustration and aid to memory than actual practical use. I've rounded up most of the values too. One important exception to this is pinfu tsumo. If you get a pinfu tsumo you can expect drastically lower scores for hands below 5 han, scoring (for 2-4 han) 1300, 2600, 5200 for nondealer, because you're using the 20 fu row for scoring. Absolutely anything other than a pinfu tsumo scores at least 30 fu base. Having a lot of sets and kans increases the base fu total so you'll be looking at a higher hand score.
| Han Multipliers | Dealer (~1.5x) | Nondealer |
| 1 | 1500 | 1000 |
| 2 | 3000 | 2000 |
| 3 | 6000 | 4000 |
| 4 | 11600 | 7700 |
| 5 (Mangan) | 12000 | 8000 |
| 6-7 (Haneman) | 18000 | 12000 |
| 8-10 (Baiman) | 24000 | 16000 |
| 11-12 (Sanbaiman) | 36000 | 24000 |
| 13 (Yakuman) | 48000 | 32000 |
